How to Create a Visual Planner: Transform Daily Life for Your Neurodivergent Child

Visual planners can be life-changing for children who are autistic, have ADHD, or struggle with daily routines and transitions. They bring calm, reduce stress, and help children feel more in control.
In this article, I’ll show you exactly how to create a simple, effective visual planner that fits your child’s needs and brings more peace to your day.
Why Use a Visual Planner With Your Child?
Do Visual Planners Really Help Children With ADHD or Autism?
Yes, more than most parents realise. A visual planner gives your child a clear idea of what’s going to happen and when. This simple tool can stop meltdowns before they start, reduce anxiety, and help your child feel safe and in control.
For children who find change or transitions hard, having a clear plan they can see and touch makes a huge difference. They don’t have to rely on memory or guess what’s coming next. This lowers stress and builds trust.
Visual planners also support independence. Instead of needing reminders, your child can check their schedule and follow the steps themselves. That sense of control is powerful. It builds confidence and helps them feel proud of what they can do on their own.
And for you? Less stress, fewer arguments, and a calmer, more predictable home life.
Step 1: Start With One Daily Routine and Break It Into Steps
What’s the Best Routine to Use a Visual Planner For?
If you try to plan your whole day in one go, it can feel overwhelming for you and your child. The key to success is starting small. Choose just one part of the day that often feels stressful. For many families I work with, this is either the morning routine or bedtime.
Think about when your child seems most anxious, resistant, or unsure. That’s the perfect place to begin. A visual schedule for just this part of the day will already make a big difference.
How Do I Break the Routine Into Simple, Visual Steps?
This part is crucial. Children with ADHD, autism, or difficulties with executive functioning often struggle with remembering or sequencing tasks. That’s where visual supports come in.
Take the routine you chose and break it down into short steps. Instead of “get ready for school,” for example, use steps like:
- Brush teeth
- Get dressed
- Pack lunch
- Put on shoes
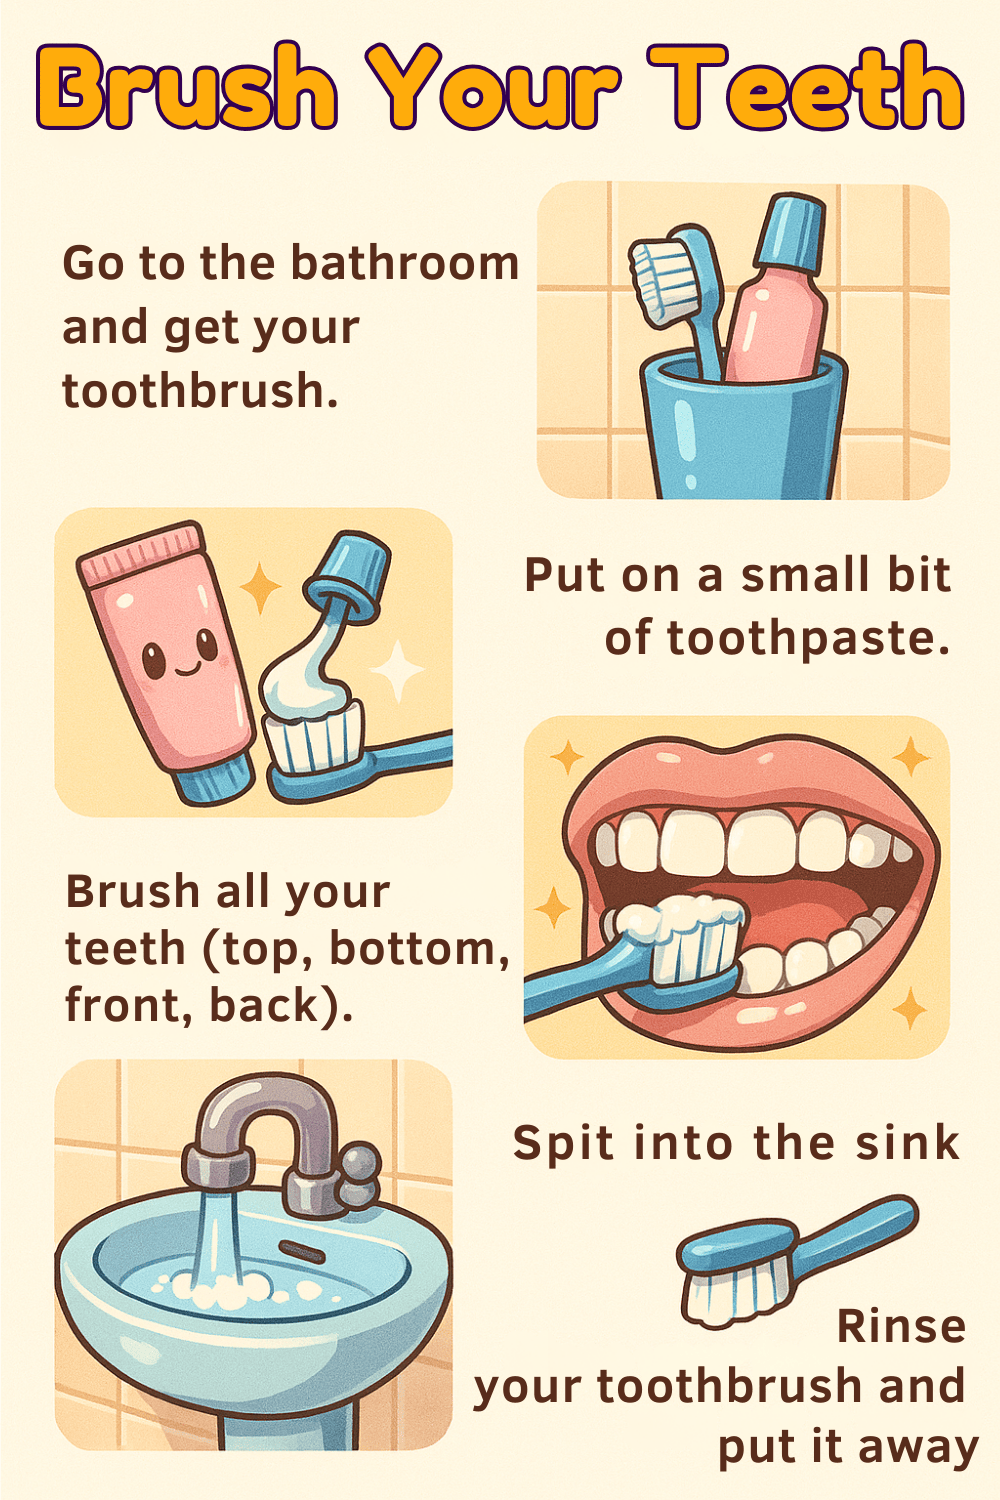
Each step should be short and clear. Aim for 3 to 5 tasks to begin with: enough to guide, but not enough to overwhelm. You can use “first–then language” (“First brush teeth, then get dressed”) to help your child understand the order.
This structure makes things feel manageable and boosts your child’s independence. It gives them a clear path, which reduces arguments and avoids confusion.
Step 2: Choose the Right Visuals and Format for Your Planner
What Format Works Best: Digital or Physical Visual Planner?
There’s no one-size-fits-all. Some children love digital tools. Others do better with something they can touch. The most important thing is choosing a format your child can easily see, reach, and interact with.
Here are a few popular options:
- Magnetic boards with moveable icons
- Printable templates you can laminate or stick on the wall
- Ring-bound planners or notebooks your child can carry
- Apps like Choiceworks or Tiimo for older children who enjoy screens
If you’re not sure where to start, begin with something physical. Children often connect better with real visuals they can move around.
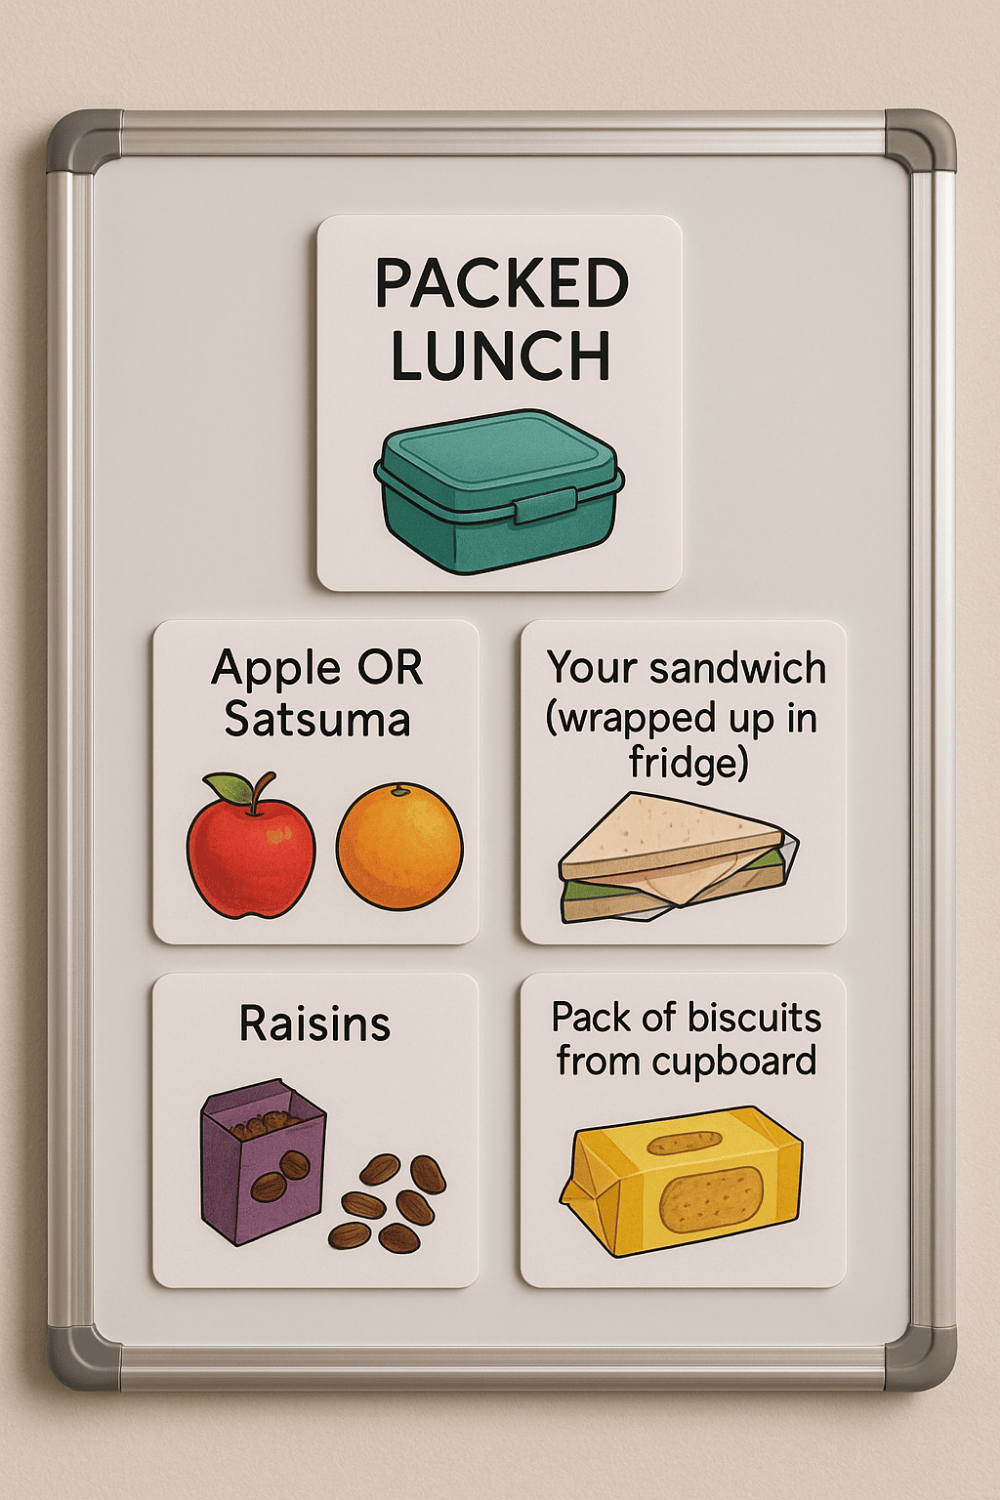
What Visuals Should I Use in the Planner?
The goal is to make the planner as clear and relatable as possible. You can use:
- Photos of your child doing each step
- Icons or emojis (there are lots of free ones online)
- Colour-coded symbols for different times of day or task types
Let your child help pick or even draw some of the pictures. When children are part of the process, they’re more likely to feel proud and engaged.
Whatever you use, make sure it’s consistent. Your child will soon start to link the picture of a toothbrush, for example, with the action of brushing teeth. That’s the power of visual supports—they build understanding without words.
Where Should I Put the Planner?
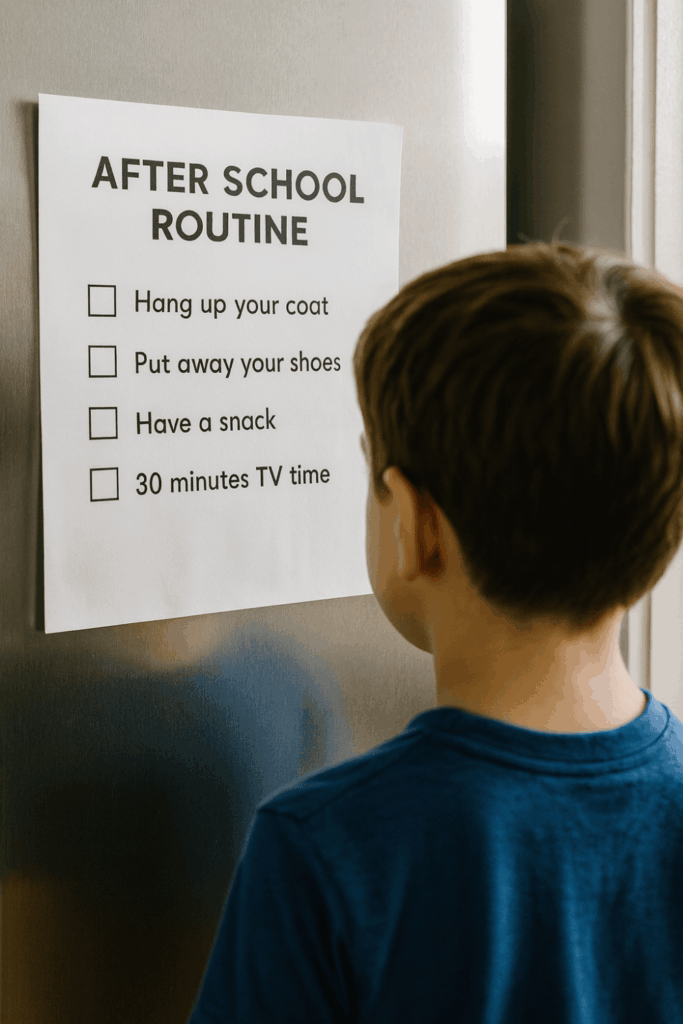
Place it at your child’s eye level, somewhere they will see it easily: on the fridge, by their bed, or near the front door. You could even make a portable planner they can carry around if transitions are tricky (like leaving the house or moving between activities).
Making the planner visible and accessible is key to building confidence and routine.
Step 3: Make the Planner Interactive and Motivating
How Can I Help My Child Stay Engaged With Their Visual Planner?
Children are far more likely to use their visual planner if it’s fun and they feel some ownership over it. The secret is to make it interactive.
Here are simple ways to do that:
- Use Velcro icons they can stick on and remove as tasks are finished
- Let them tick checkboxes or move magnets from “to do” to “done”
- Add a small countdown or timer to show how long each step might take
These small actions give your child a sense of progress and control, which is especially powerful for children with ADHD or those who find transitions hard.
Why Should I Let My Child Help Create It?
Because when your child helps design their planner, it becomes theirs. Whether it’s choosing icons, drawing pictures, or picking their favourite colours, this involvement builds independence, pride, and motivation.
And remember, visual planners aren’t just a tool. They’re a way of showing your child: “You’re capable. I believe in you.”

Step 4: Teach Your Child to Use the Planner With Confidence
How Do I Help My Child Understand Their Visual Planner?
Start by sitting with your child and walking through each part of the planner together. Keep your language simple and calm. For example: “This shows what we’ll do to get ready for school. Let’s look at each step.”
Point to the pictures or icons and explain what they mean. Model what to do, and take turns acting out the routine using the planner.
If your child is unsure, stay with them and guide them through it for the first few days. Use the same phrases each time, like “What’s next on your planner?” or “Let’s check your plan together.”
Over time, your child will begin to use it more independently. That’s when the real magic happens.
How Often Should We Use It?
The answer is: as often as possible. Consistency is key. Use the planner every time the chosen routine happens. That repetition helps your child feel safe and builds the habit.
Make it part of your language too. “Your planner says it’s time to pack your bag. Let’s do that now.” This gentle reminder builds trust in the planner, and soon your child will begin to check it on their own.
Using it regularly also helps reduce reliance on verbal prompts, which can sometimes lead to arguments or pressure.
What If My Child Doesn’t Want to Use It?
This is normal at first. If your child is resistant, stay calm and curious. It might help to simplify the planner or start with just two steps. You could also offer a small reward after they use it, like a sticker or choosing the next family activity.
Always aim to build positive feelings around the planner. If it feels safe and helpful, they’re much more likely to return to it.
Step 5: Review, Adjust and Expand Over Time
How Can I Keep the Visual Planner Working as My Child Grows?
Visual planners aren’t set-and-forget tools. Your child’s needs will change, and their planner should grow with them.
Each day or week, take a few minutes to review the planner together. Ask simple questions like, “What worked well?” or “Was anything confusing?” This helps your child feel involved and gives you valuable feedback.
If something isn’t working, that’s okay. Try removing one step, changing the visual, or rearranging the order. These small tweaks can make a big difference.
When Should I Add New Routines?
Once your child is using their first planner confidently, you can start to add new routines, like:
- Bedtime
- Homework time
- Getting ready for an outing
- Weekend plans
Keep using the same approach: simple steps, clear visuals, and positive feedback. As your child builds success, their independence and confidence will grow.
Can We Use Visual Planners Outside the Home?
Absolutely. Many families find visual planners just as helpful in school settings, during community outings, or when visiting new places.
You might create a portable version to take in the car or use at Grandma’s house. Or you could try a digital app like Choiceworks for older children who are used to screens.
The goal is to provide the same sense of safety and structure, no matter where you are.
The Gift of Calm: What a Visual Planner Can Do for Your Family
A visual planner can be a lifeline on the tough days and make things feel amazingly smooth – even easy! – on the good ones.
When your child can understand what’s coming, take control of their routine, and see their own progress, their world feels safer. They feel more capable. And you get to step out of that constant role of prompting, reminding, or firefighting.

Need More Support To Help Your Child With Behaviour and Emotion Regulation?
A visual planner is an essential tool but if your child is still having outbursts, please do take a look at my short on-demand course, End Emotional Outbursts.
This online course is for parents of 7–13-year-olds who are struggling with emotional and behavioural outbursts. It’s designed to give you practical, down-to-earth tools you can start using in your home, even if you only have ten minutes a day.
You’ll learn:
- Why children have meltdowns and what’s happening in their nervous system
- What’s filling (or overflowing) your child’s “emotional cup”
- Simple steps to reduce outbursts and help your child feel calmer and more in control
You get immediate access to five bite-sized video lessons and PDF guides, delivered straight to your inbox. Most families complete it in under a week, and many see a difference in that time, but you get lifetime access so you can take as long as you need.
Parents often tell us this course helped them feel more confident, reduced rows and conflicts at home, and gave their child tools they’ll use for life.
Click here to join End Emotional Outbursts – just £30 for lifetime access.
Related Articles
Self-Care For Children and Teens With ADHD (Parent Guide and FREE PLANNER)
ADHD Worksheets For Kids To Empower & Inspire {Free Printable}
Dr Lucy Russell is a UK clinical psychologist who works with children and families. Her work involves both therapeutic support and autism assessments. She is the Clinical Director of Everlief Child Psychology, and also worked in the National Health Service for many years. In 2019 Lucy launched They Are The Future, a support website for parents of school-aged children.
Through TATF Lucy is passionate about giving practical, manageable strategies to parents and children who may otherwise struggle to find the support they need.
Lucy is a mum to two teenage children. She lives in Buckinghamshire with her husband, children, rescue dog and three rescue cats. She enjoys caravanning and outdoor living, singing and musical theatre.